
Integrating IIoT Devices With Epicor
Epicor ERP - Kinetic & v10
In 2019 Epicor added a module for IIoT integrations to the platform. This article will walk you through how everything works so that you can decide whether this module is a fit for you.
2022 Update:
If you are checking out this article you are likely interested, as I am, in how we can better integrate shop floor equipment into ERP systems. This article is very DIY / “proof of concept” oriented, which might be exactly what you are looking for. But if you happen to be looking for a more polished way to integrate Epicor specifically with CNC machines (FANUC, Haas, etc.) please also have a look at my other product, Harmoni. Harmoni is a device you can simply plug into these sorts of machines and it will not only collect machine data but also handle your MES transactions.
What Is IoT?
First off, let’s level set on terminology and concepts here. We define IoT (or Internet of Things) as a network of physical objects that contain embedded technology to communicate and sense or interact with their internal states or the external environment. You may have some of these sorts of fantastic devices in your home:

Various consumer grade IoT devices
What Is IIoT?
Now then, what is IIoT? IIoT stands for “Industrial Internet of Things,” and it applies a similar approach to integrating a network of devices to improve the way we work in industrial settings. Of course, the idea of computers in manufacturing is nothing new - the first PLC-empowered equipment on record was in 1968, and the spread of that technology throughout the world is a large part of our 3rd Industrial Revolution. IIoT represents an expansion on the PLC-era of technology, making it easier for different devices and software to integrate by speaking a universal language. It also embraces using the cloud for cheap storage, scalable processing, and value-add services like Machine Learning. Many predict the IIoT era will be so revolutionary to industry that it will usher in a 4th Industrial Revolution.

Epicor + IIoT Devices: Communications Overview
So how do these IIoT devices with Epicor? The diagram below gives you a high-level overview:

So we start with the devices themselves - whether you already have IIoT equiped machinery or you have added 3rd party / DIY sensors, the ideas here are the same. There is going to be a tiny sensor-equipped computer capable of reading information (temperature, quantity completions, etc.) and potentially controlling hardware that has programming written for it to decide how it should operate. Unlike the PLCs of the past, where it used ladder logic, these devices are programmed using modern languages like Python, C#, Node.js, etc. Also, because this device is going to be leveraging the Internet, security is tremendously important. The cloud IoT platforms out there support the latest and most secure methods of communication, and I won’t dig into all of the details here. For this example, we are using simpler connection-string based connection to the cloud platform.
Next, we get to the cloud platform. There are a variety of IoT cloud providers out there - Microsoft Azure, Google Cloud, Siemens, and many more. Most of them are going to operate on a similar technology stack which is commonly referred to as “Pub / Sub,” which stands for “publish” and “subscribe.” That is precisely how it works - there are “channels” you set up and add all your devices/software. From there, the devices/software can decide what messages they want to listen for and what messages they want to themselves publish. It is sort of like a big group chat for your devices and software. One of the great benefits of leveraging a cloud platform is that there are value-add services in the platform itself that can also join the channel doing things like cheaply archiving/summarizing transactions.
The last part to discuss here is the software - in our case, Epicor. As mentioned in the previous section, the software can be added to a pub/sub channel just like any other device and similarly decide what messages it wants to listen for and what message it wishes to publish. Epicor makes this easy with their IoT module allowing you set all of this up with a graphical interface and turn these messages into calls that can fire BPMs, update records within Epicor, or store in tables that you can report from via BAQs. Note that at this time only Microsoft Azure is supported for this module.
Azure Setup
As mentioned above, Epicor IoT only works with Azure currently. Azure offers a free tier that allows you to send up to 8,000 messages a day and you can jump up to 400,000 messages per day for only $25 per month (see https://azure.microsoft.com/en-us/pricing/details/iot-hub/ for additional details on scaled pricing). If you are new to Azure, you will also get a $200 credit on your account to start. In short, this is very inexpensive.

The first step is to create an IoT Hub resource, which is simple enough - click that ‘Create Resource’ link along the left-hand side and fill in a name for the IoT Hub.

When you create the IoT hub, navigate to it, and click on the ‘IoT Devices’ link. Here is where of your IoT devices and at the same time generate the connection string/certificates they will need to communicate. Note that the way that the Epicor integration works you do not need to create a “device” for Epicor.
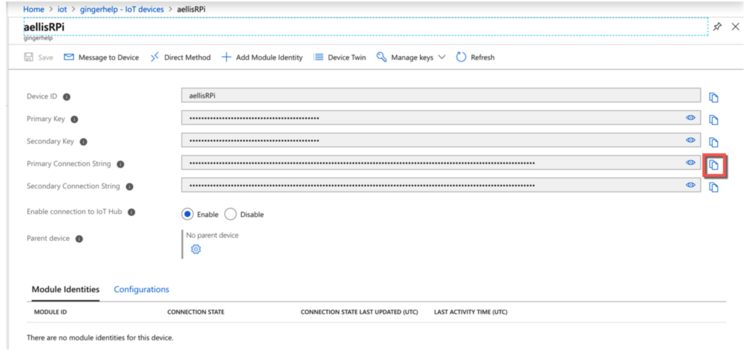
I am using simple connection strings to communicate in this tutorial so, upon device creation, you will want to copy that connection string to your clipboard as indicated here.
IIoT Device Setup

Now let’s talk about the IIoT hardware. As mentioned earlier, your equipment may already have IIoT sensors - in which case you would likely just be using some sort of wizard to point it to Azure and be on your way. But if that is not the case or you just want to learn, I am going to document a bit of a DIY approach here. You will almost certainly use a much more ruggedized setup in production, but for testing here is the components that will get you started:
Raspberry Pi 4 Model B: $35
32GB micro SD card: $5
Kuman Raspberry Pi Starter Kit: $30
Download Raspbian Stretch zip file & extract to SD card: https://www.raspberrypi.org/downloads
Install SD card in Pi, hook it up to a keyboard / monitor and follow the graphical installation
Install Azure Tools For Python:
sudo pip install azure-iot-deviceInstall Adafruit_DHT Library:
sudo pip install Adafruit_DHT

I believe if you get an opportunity to play with Legos and justify it as “work” you should absolutely do so - as such I built myself a Lego “factory” to demo all of this functionality. Here you can see how I wired up my breadboard:
The LED is going to be flipped on whenever I have successfully connected to Azure.
The blue sensor in the middle of the image is a DHT11 which is the temperature and humidity sensor that comes in the Kuman kit.
The button along the far left will simulate a quantity completion on the machine that will also gather the temperature / humidity to publish to Azure / Epicor.
Now we get to the programming side of things. In my example here I am using Python just because it reads a little easier for newcomers.
Shopfloor.py
import datetime
import random
import time
import sys
import Adafruit_DHT
import RPi.GPIO as GPIO


# Set up the ports on the GPIO
GPIO.setmode(GPIO.BCM)
GPIO.setwarnings(False)
GPIO.setup(18,GPIO.OUT)
GPIO.setup(23, GPIO.IN, pull_up_down=GPIO.PUD_UP)
GPIO.setup(22, GPIO.OUT)

from azure.iot.device import IoTHubDeviceClient, Message, MethodResponse

# The device connection string to authenticate the device with your IoT hub.
CONNECTION_STRING = "Connection string noted earlier"

# Define the JSON message to send to IoT Hub.
TEMPERATURE = 20.0
HUMIDITY = 60
MSG_TXT = '{{ "ts": , "temperature": ,"humidity": '

def iothub_client_init():
    # Create an IoT Hub client
    client = IoTHubDeviceClient.create_from_connection_string(CONNECTION_STRING)
    return client

def iothub_client_telemetry_sample_run():
    try:
        client = iothub_client_init()
        print ( "IoT Hub device sending periodic messages, press Ctrl-C to exit" )
        GPIO.output(18,GPIO.HIGH)          # This is what turns my LED on when connected to Azure

        # Just keep looping until the user interrupts
        while True:
            input_state = GPIO.input(23)   # Read the state of that button along the far left
            if input_state == False:       # False means the button is pressed
                print('Button Pressed')    # Writes out to the console
                humidity, temperature_c = Adafruit_DHT.read_retry(11, 4)
                temperature_f = temperature_c * (9 / 5) + 32
                msg_txt_formatted = MSG_TXT.format(ts=int(time.time()), temperature=temperature_f, humidity=humidity)
                message = Message(msg_txt_formatted)

                # Add a custom application property to the message
                # An IoT hub can filter on these properties without access to the message body.
                if temperature_f > 74:
                    message.custom_properties["temperatureAlert"] = "true"
                else:
                    message.custom_properties["temperatureAlert"] = "false"

                # Send the message.
                print( "Sending message: %s" % msg_txt_formatted )
                client.send_message(message)
                time.sleep(0.2)

    except KeyboardInterrupt:
        print ( "IoTHubClient sample stopped" )
        GPIO.output(18,GPIO.LOW)
        GPIO.cleanup()


if __name__ == '__main__':
    print ( "IoT Hub Lego Factory Example" )
    print ( "Press Ctrl-C to exit" )
    iothub_client_telemetry_sample_run()
Epicor Setup
Now we are ready to connect to Epicor. If you have licensed the Epicor IoT module these are the steps you will need to follow to get it wired up.
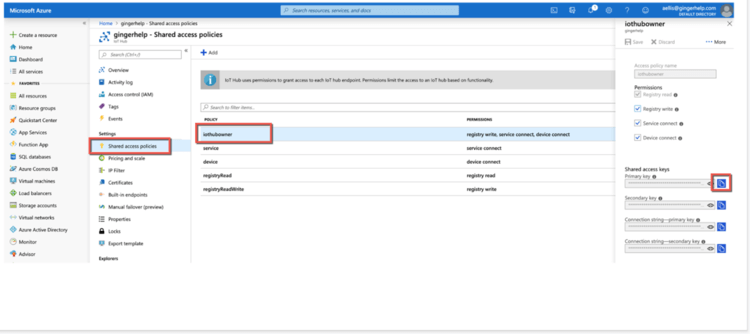
First you will want to copy the shared access key for the ‘iothubowner’ policy within the IoT Hub in Azure.

You will next want to copy the event hub connection string and add a new consumer group called ‘epicor’ under the ‘Built-in endpoints’ section in Azure.

Now within Epicor load the ‘IoT Configuration’ menu item.
Press ‘New’ and fill in the first connection string with the IoT Hub connection string noted earlier.
Leave processing mode as ‘Local’. Cloud implies a more complex Azure Service Bus setup is in use.
Fill in Event hub connection string noted earlier along with consumer group.
Specify companies and press Save.
You will know that everything worked correctly if, when you hit save, the IoT Hub name populates with how it was defined out in Azure.

Next use the ‘IoT Device Group’ module to create a device group. This can act as a way of grouping devices together to apply the same rules / logic against all of them.

Now head over to the ‘IoT Device Management’ module and select ‘Add Device(s) from IoT Hub’ under the Actions menu.

Here Epicor will connect to Azure and read in a list of all the devices you registered to the IoT Hub. Add the ones you want by selecting them on the left hand side and moving them to the right. Then click ‘Add Devices’.

You can now load up a device within this screen and verify it is properly communicating. You can see from this screenshot that my device is registered and connected. You can also use this screen to associate this device with a record in Epicor that could come in handy later on to tie things together.

Next we go to the IoT Rule Designer module to define how Epicor responds to the traffic it will start seeing coming from the channel. After giving it a name, the two toggles along the bottom have a significant impact on behavior:
Stateful means that it will only trigger when a “state” (defined on the rule tab) changes.
Store event data records transactions into IoTDeviceEvent table.
Consider transaction volume here. History can be stored much cheaper in an Azure blob storage endpoint than your Epicor SQL Server database. Only store what you need to store in Epicor.

Next we go to the Rule tab to decides which data from the device causes a trigger to occur. Pick the operation first (here the “greater than” operation), then ‘var’ to access payload data, then the field name (here “ts” for the timestamp field in the payload). Next select “value” to test the value in that field and the threshold to compare against. Use the Json or Sample Data section to provide the rule with sample data and press test to both validate and activate the rule.
Example payload from this demo:
{ "ts": 1565535177, "temperature": 84.2, "humidity": 44.0, "qtyCompleted": 1 }

Now pick which devices or device groups that this rule applies to by typing in the respective box and pressing the + button. Save and we are done with this screen.

As a final step we need to schedule the ‘IoT Device Event Retriever’ and ‘IoT Device Event Processor’.
Usage
Now finally to the fun part. Here are all of the fantastic things you can do now that this is all wired up:
BAQs

If you selected the option on your rule to store event data, payloads will be stored in IoTDeviceEvent table for reporting. The payload is in JSON format and would take some formulas to parse out.
BPMs

New events that meet your rule criteria pass through Ice.IoTDeviceEvent.OnProcessEvent.
Add the same sorts of BPMs in here to perform notifications, update records, etc.
DO NOT use any sort of message pop-ups since this will not tie to a user session.

When you create a BPM you are most likely going to want to add a reference to Newtonsoft.Json from the Epicor client directory. This library makes it much easier to parse the payload data.

The condition widget can be used to cause the BPM to only act if it was caused by a certain rule.

This is a bit of a silly BPM but it illustrates the point - you parse the payload with JObject.Parse and from there can do whatever you want - here I am just going out and writing the temperature into Number20 on the first record in UD01.

There are also methods on the IoTDevice Business Object that allow us to SEND data from Epicor to the channel. Obviously the device would need to be programmed to accept this message and do something with it, but the possibilities are endless!
Additional Resources
Microsoft Article On Setting Up A RPi From Scratch & Communicating To Azure
https://docs.microsoft.com/en-us/azure/iot-hub/quickstart-send-telemetry-python
Similar Article Just For Node.Js - Provides More Detailed Steps On Setting Up RPi
https://docs.microsoft.com/en-us/azure/iot-hub/iot-hub-raspberry-pi-kit-node-get-started
